AI Toolkit has just released a groundbreaking update that transforms it into the most comprehensive LoRA training platform for image and video generation. This powerful tool now supports an impressive array of cutting-edge models, including WAN video series (5B and 14B), Hidream E1 with low VRAM mode, OmniGen2 fine-tuning capabilities, and enhanced FLUX.1-Kontext-dev support. Whether you're looking to train custom LoRA models for creating stunning visuals, personalized artwork, or dynamic video content, AI Toolkit's latest update positions it as the go-to solution for both beginners and advanced practitioners in the creative AI space.
LoRA training is absolutely crucial for achieving consistent style and character coherence across your AI-generated content. Without proper LoRA customization, maintaining visual consistency in your projects becomes nearly impossible, especially when creating a series of images or videos that need to follow specific artistic styles or character designs.
In this comprehensive guide, we'll walk you through everything you need to know about leveraging AI-ToolKit's new features for your LoRA training projects. Best of all, you can access AI Toolkit's full power through MimicPC's cloud platform online, eliminating the need for expensive GPU hardware or complex local installations – simply log in and start training your custom models instantly.
AI Toolkit's Latest Update: New Base Model Support for LoRA Training
The latest AI Toolkit update introduces support for multiple cutting-edge base models, dramatically expanding your LoRA training capabilities for image and video generation. This update makes advanced LoRA training more accessible while supporting the newest and most powerful foundation models.
WAN 2.2 Series LoRA Training Support
AI Toolkit now supports LoRA training for both WAN 2.2 5B and WAN 2.2 14B base models, expanding beyond the previous WAN 2.1 LoRA training support. These newer foundation models offer improved visual understanding and generation quality, making your custom LoRA adaptations more effective for maintaining consistent character designs and artistic styles.
Hidream E1 LoRA Training Integration
The platform now enables LoRA training on the Hidream E1 base model, which features a revolutionary low VRAM running mode. This allows creators to train custom LoRAs on the Hidream E1 foundation model even with consumer-grade hardware, democratizing access to this powerful base model's capabilities.
OmniGen2 LoRA Training Support
AI Toolkit has added support for LoRA training on OmniGen2, enabling creators to fine-tune this advanced base model with their custom datasets. This opens up new possibilities for specialized image generation workflows that leverage OmniGen2's unique architectural advantages.
FLUX.1-Kontext-dev LoRA Training Enhancement
The update includes enhanced support for LoRA training on the FLUX.1-Kontext-dev base model, improving the Flux dev LoRA trainer workflow. This integration resolves previous compatibility issues and optimizes the training process specifically for the FLUX.1-Kontext-dev foundation model, making it more reliable for professional creative projects.
Step-by-Step Guide: How to Train LoRA with AI Toolkit
Training a custom LoRA model with AI Toolkit is straightforward when you follow this comprehensive guide. This process will walk you through everything from dataset preparation to final model output, ensuring you get professional-quality results for your image generation projects.
Step 1: Upload Your Dataset
- Create a New Dataset Folder
The folder creation process depends on your training model:
- For FLUX DEV and Wan2.2 LoRA Training: Navigate to the Datasets section and create a new folder for your project, then rename it with a descriptive name that reflects your project's purpose. This naming convention helps when managing multiple LoRA training projects simultaneously.


- For FLUX Kontext LoRA Training: Navigate to the Datasets section and create three separate new dataset folders, then rename them as "control", "target", and "test" respectively.
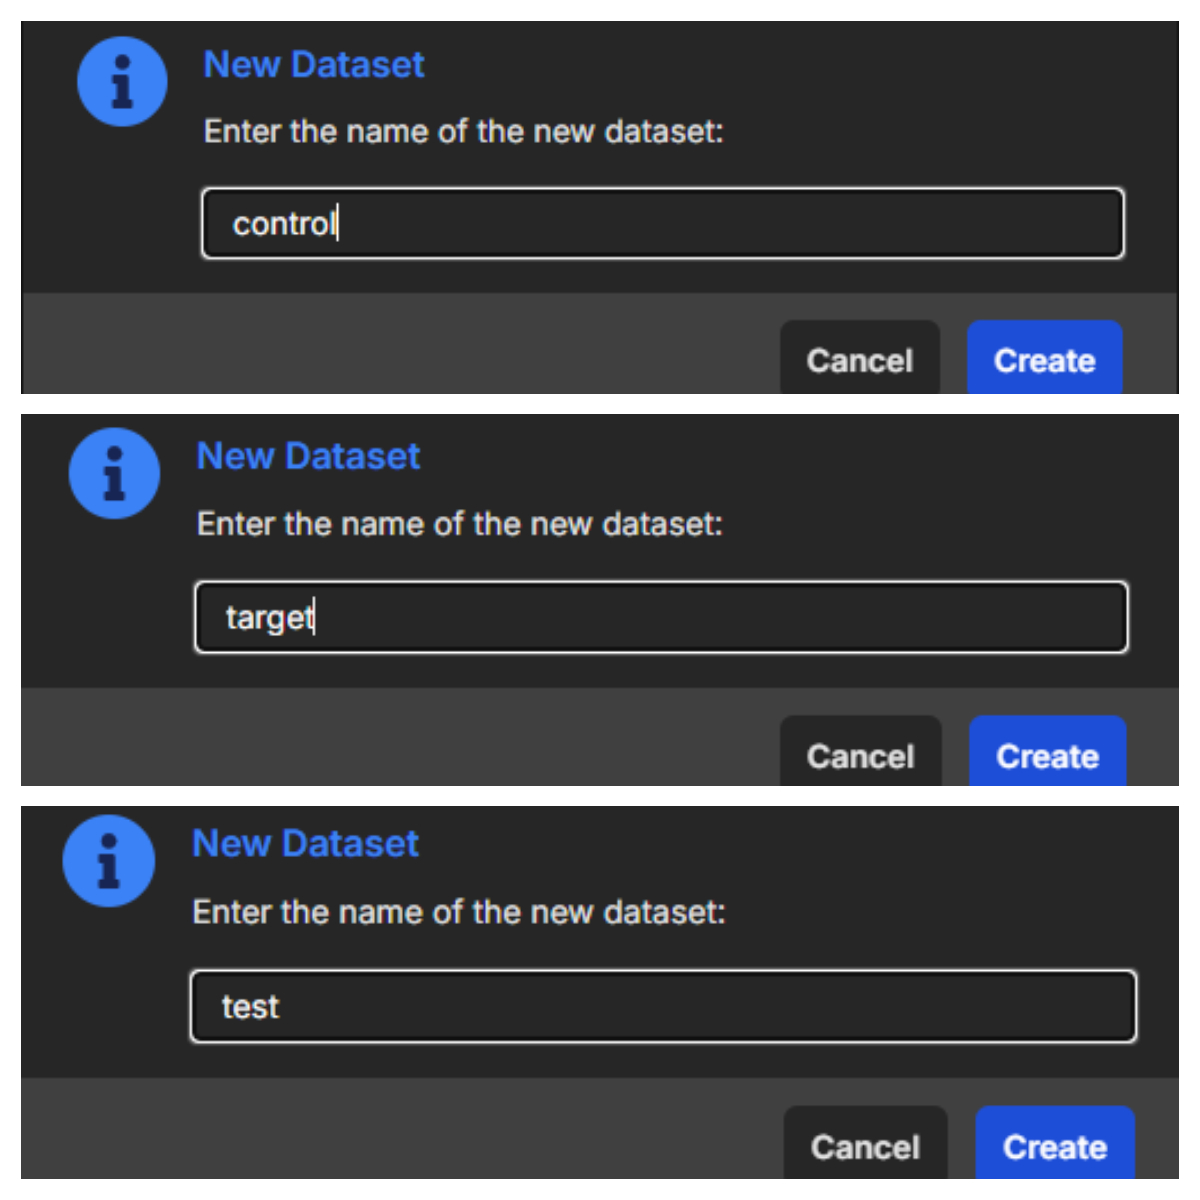
- Import Your Training Dataset
The dataset preparation varies depending on your training model:
- For FLUX DEV LoRA Training: Prepare your image dataset locally with proper TXT format annotations. Upload both images and text labels simultaneously, ensuring label names match images exactly for proper detection. All images must have identical aspect ratios for consistent training results. Preview your uploaded content to verify proper label-image matching, with minor errors editable directly in the blue selection area.


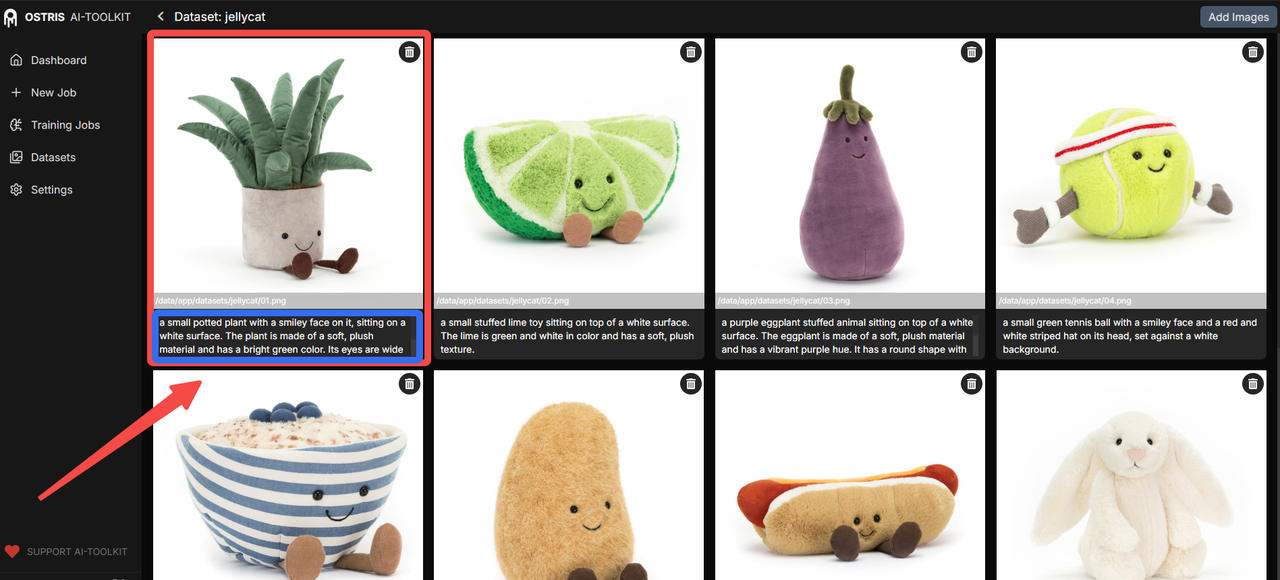
- For Wan2.2 LoRA Training: Prepare your image/video dataset locally using PNG format for images and MP4 for videos, with TXT format annotations. Dataset must maintain uniform format - entirely images OR entirely videos, no mixing allowed. Upload both media files and text labels simultaneously with matching names. Each image/video must have identical aspect ratios, and for video datasets, use editing software to standardize video length before upload. Preview and verify proper matching, with editing options available in the blue selection area.
- For FLUX Kontext LoRA Training:
- Upload to control folder: original base images (for single image generation, upload standardized images; for multi-image generation, combine multiple images using editing software before upload - no labeling required).
- Upload to target folder: final expected result images representing your desired output.
- Upload to test folder: validation images (can reuse control folder images).

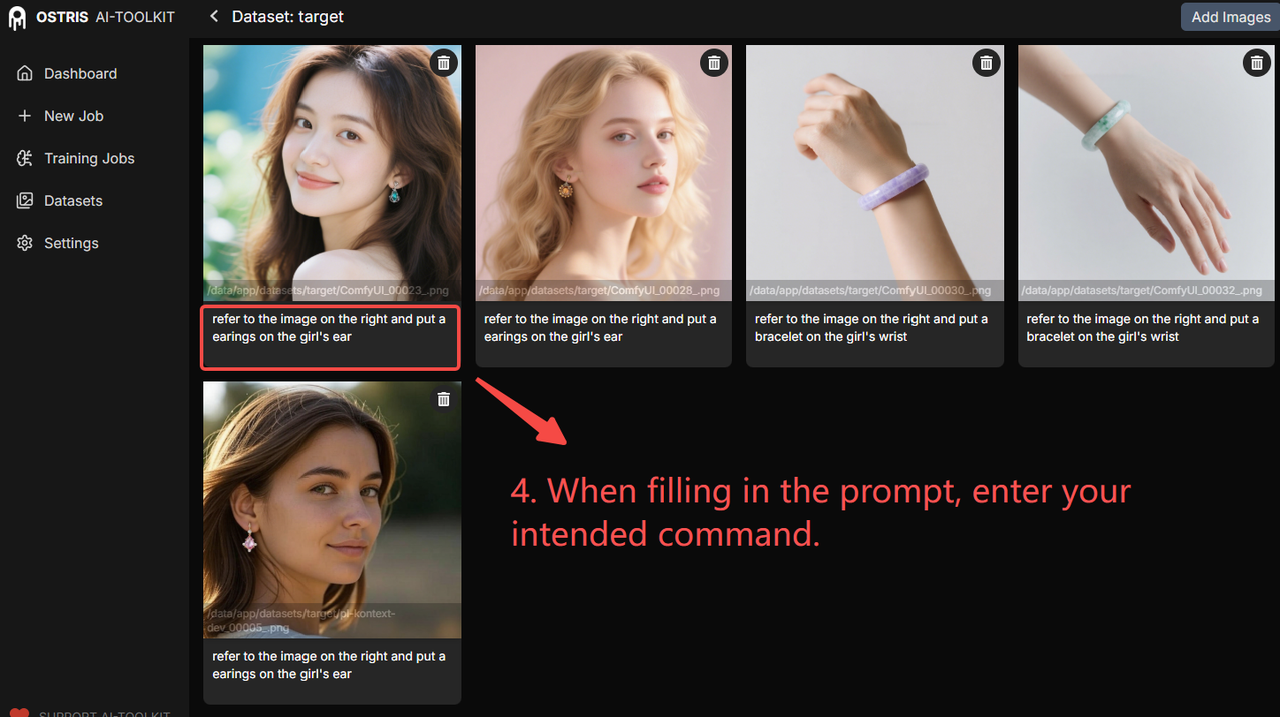
- Verify Dataset Quality
After uploading sample images, preview your images and labels to ensure they match correctly. The interface allows you to edit image labels directly in the blue selection area if you notice any minor errors or need to make quick adjustments to improve training quality.
Step 2: Configure Your LoRA Project
- Project Setup
Create a new training job by navigating to the New Job section. Choose a descriptive name for your model that reflects its intended purpose or style. If your system has multiple GPUs available, select the specific GPU you want to use for training to optimize resource allocation.
Add a trigger word if needed for your LoRA model. This trigger word should be unique and not overlap with your training name to avoid conflicts during generation.

- Base Model Selection
Choose your desired checkpoint (base model) from the available options. AI Toolkit supports various foundation models including FLUX, WAN series, and others. The system will automatically populate the Hugging Face model path once you select a checkpoint, though you can manually specify custom paths if needed.

- Quantization Settings
For most users, the default quantization settings work well. However, if you're using a GPU with less than 32GB of VRAM, change the setting from float8 to 6-bit quantization. This adjustment prevents memory issues and ensures stable training on consumer-grade hardware.


Higher quantization numbers require more GPU memory but can potentially improve training quality if your hardware supports it.
- Linear Rank Configuration
The default Linear Rank value (32) works well for standard resolutions. If your dataset exceeds 1024x1024 resolution, reduce this value to 16. This optimization helps manage the computational load when working with FLUX-DEV's 120 billion parameters and improves training speed.

- Save Configuration
Configure your save settings based on your needs. "Save Every 250" means the system will create a checkpoint every 250 training steps, while "Max Step Saves to Keep: 4" limits storage to the four most recent model versions to manage disk space efficiently.

Step 3: Training Parameters
- Basic Settings
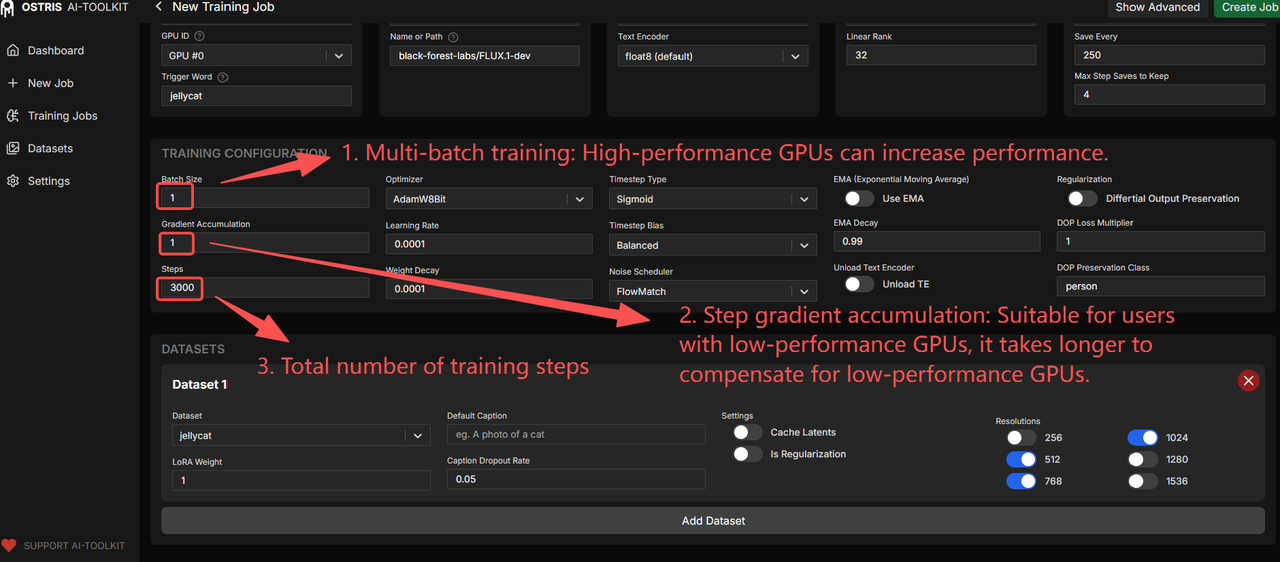
Set your batch size according to your GPU's VRAM capacity. Higher VRAM allows for larger batch sizes, which can improve training stability and speed. The trainer automatically enables multi-batch processing to enhance model generalization.
Adjust Gradient Accumulation for lower VRAM systems. Increasing gradient accumulation steps allows training on less powerful GPUs by trading training time for memory efficiency.
- Algorithm Selection
Choose between Weighted (default, good for general use and learns image information chronologically) and Sigmoid (focuses on middle training steps, ideal for single-person portrait training) based on your specific project requirements.

Step 4: Dataset Configuration
- Load Your Dataset
Select your previously uploaded dataset from the dropdown menu. If you need to combine multiple datasets, use the "Add Dataset" button to include additional training data sources.
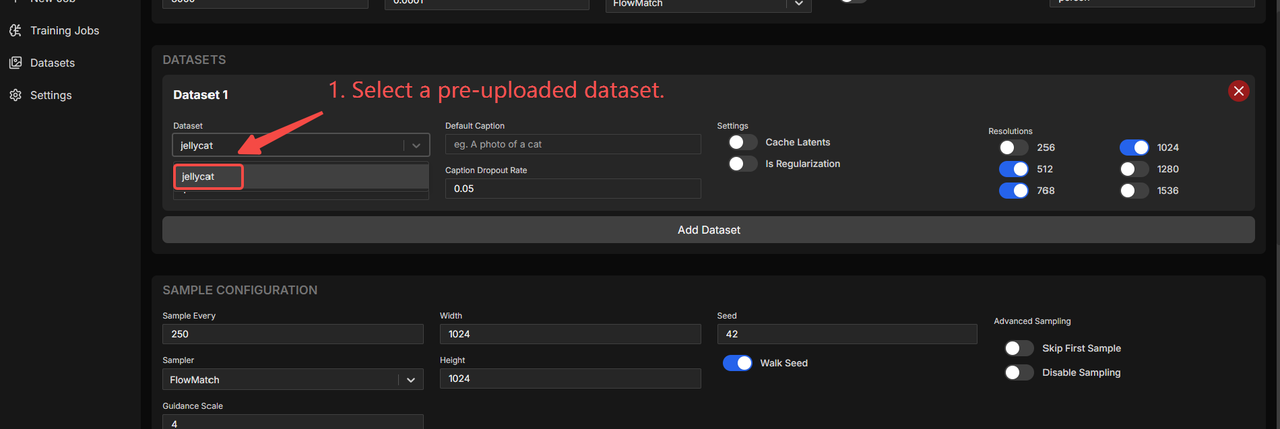
- Resolution Settings
Choose a resolution that closely matches your dataset's native resolution. Enable only one resolution option to maintain consistency throughout the training process. If you're training Wan2.2 LoRA, set Num Frames to 1 for image datasets, or use common frame counts like 81 or 121 for video datasets.

Step 5: Sampling and Testing
- Configure Sample Detection
Set up sampling parameters to monitor your model's progress during training. This feature creates preview generations that help you assess whether the training is proceeding as expected without affecting your labeled dataset.
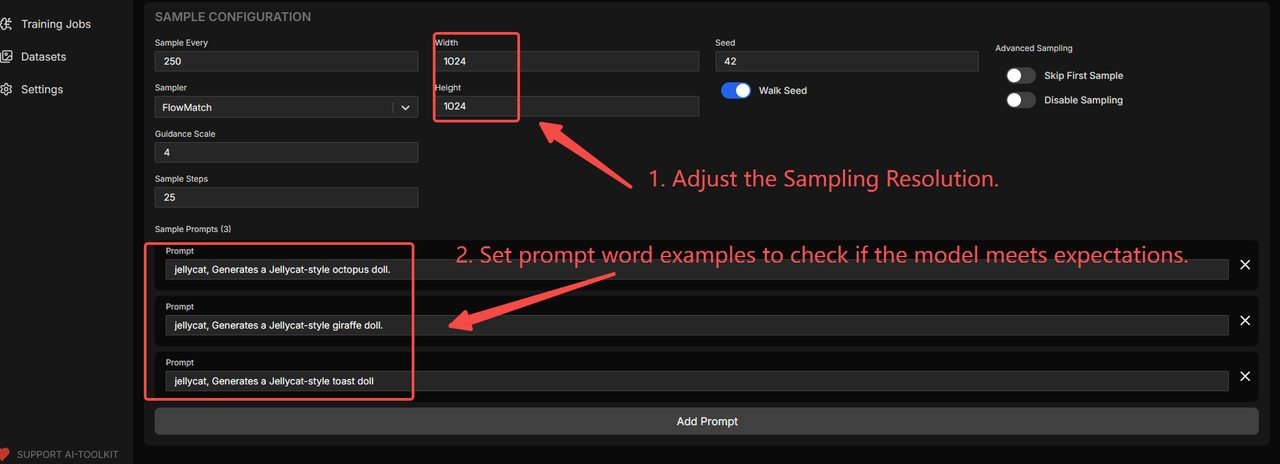
- Create Project Template
Finalize your configuration by clicking the "Create Job" button to create the project template. The system will automatically return you to the main interface, where you can monitor your training progress.

Step 6: Execute Training
- Start Training Process
Click the execute button to start your LoRA training job using the configured parameters. The AI Toolkit will begin processing your dataset according to your specifications.
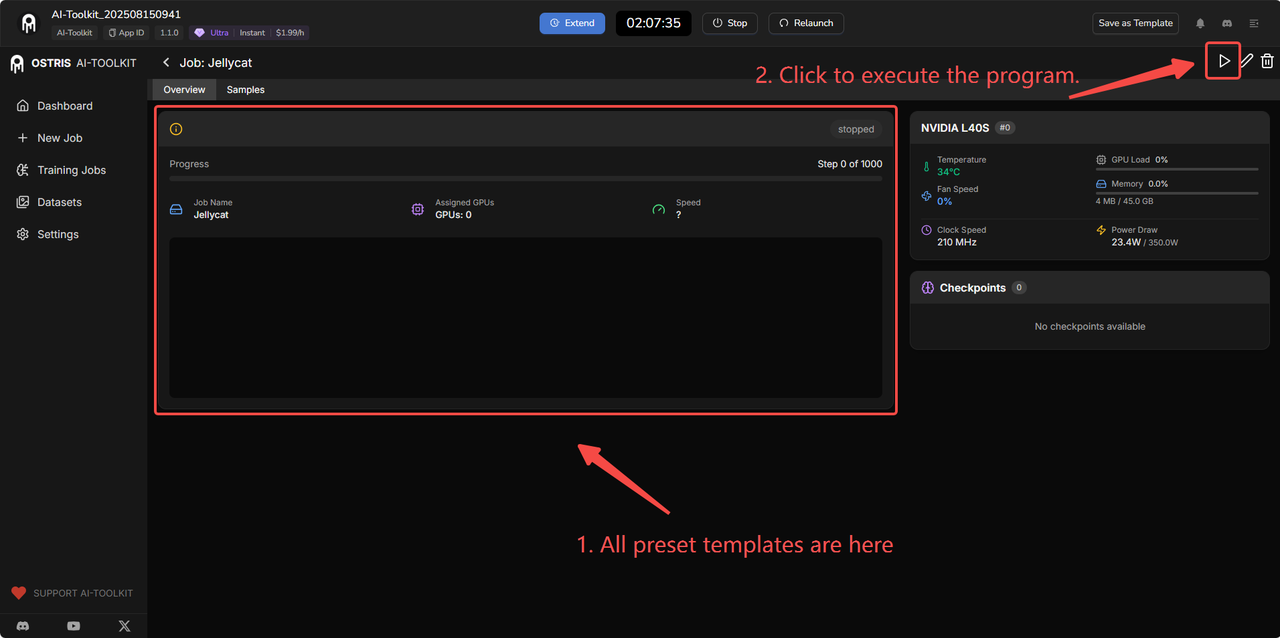
- Monitor Progress
Keep track of your training through the log interface, which provides real-time updates on training progress, loss values, and any potential issues that might arise during the process.

- Review Sample Outputs
During training, the system generates test samples at regular intervals. Review these preview images to assess the quality and direction of your LoRA training:
- Compare generated samples with your target style
- Identify any issues early in the training process
- Make adjustments if needed for future training runs
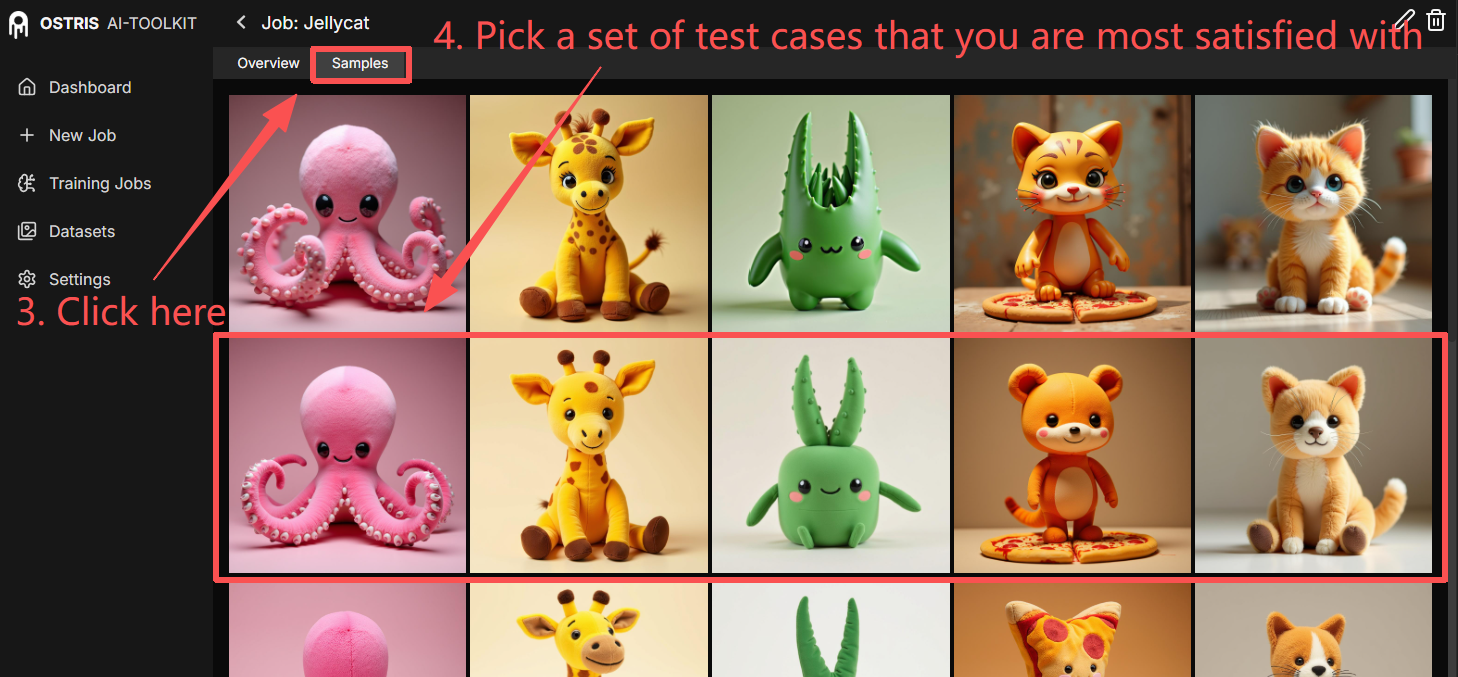
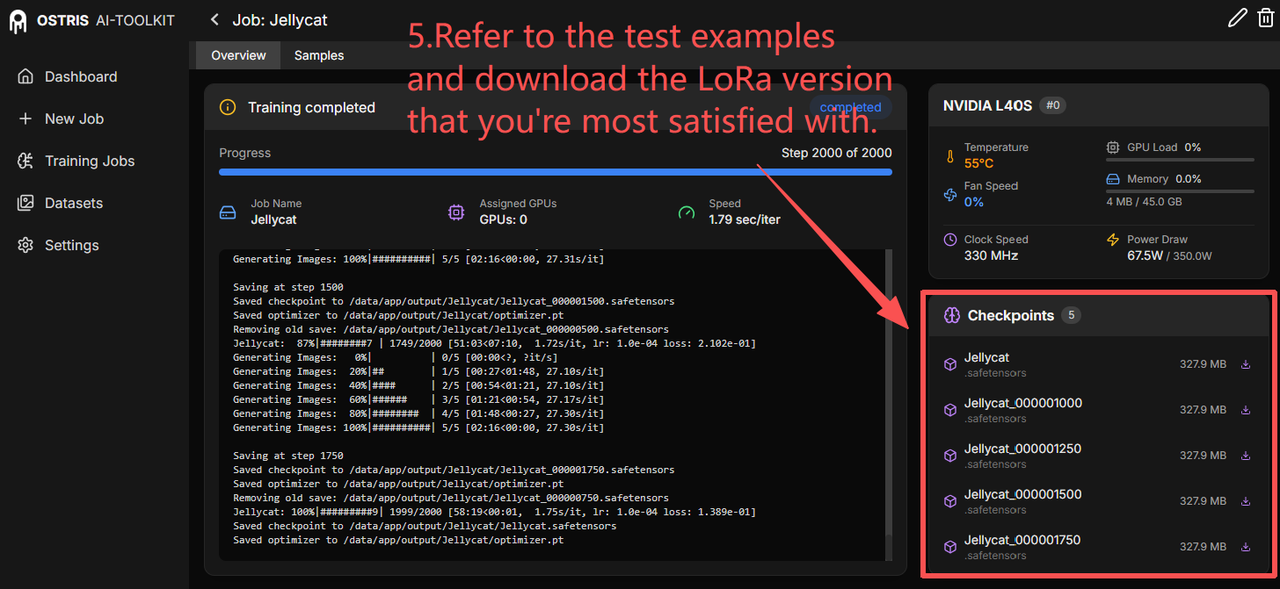
- Save and Download Results
Once training completes successfully:
- Multiple checkpoint versions are automatically saved
- Download the LoRA model that best matches your requirements
- Each checkpoint shows file size and training step information
- Select the version that produces the most satisfactory results
 This comprehensive approach to LoRA training with the AI Toolkit ensures you achieve consistent, high-quality results tailored to your specific creative vision and requirements.
Conclusion
AI Toolkit's latest update represents a significant leap forward in democratizing advanced LoRA training capabilities. With expanded support for cutting-edge base models, including WAN Video series, Hidream E1, OmniGen2, and enhanced FLUX.1-Kontext-dev integration, creators now have unprecedented flexibility to generate images that perfectly match their creative vision. The comprehensive step-by-step training process ensures that anyone can prepare their training dataset effectively and achieve professional-quality results, particularly with the improved Flux LoRA training workflows that deliver exceptional consistency and style control.
The most compelling advantage of this update is how it removes traditional barriers to entry. Previously, advanced LoRA training required expensive local hardware setups, complex software installations, and extensive technical knowledge. Now, creators can access these powerful capabilities through an intuitive interface that handles all the complexity behind the scenes.
Ready to transform your creative workflow? Experience the power of AI Toolkit through MimicPC's cloud-based platform. You can start training custom LoRAs immediately without any local installations, complex deployments, or the need for high-end GPUs. Simply access AI Toolkit online and begin creating professional-quality custom models within minutes. Visit MimicPC today and discover how easy advanced AI model training can be when the right tools meet the right platform.
